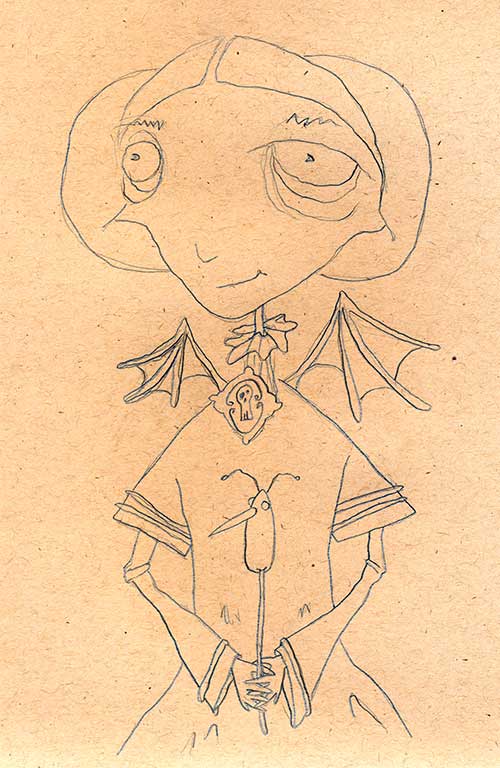
This is a sketch for Emma, exactly as she (originally) appeared in my sketchbook. I say “originally” because the first thing I did after I scanned her in was change my mind about the bat wings and completely erase them. (Physically. With an eraser.) I used a kraft paper sketchbook (Earthbound Recycled Sketch Book, 7″x10″ by Cachet) which makes the page look discolored (and it’s not really as yellow as it looks here).
I’m planning on including Emma in a duo exhibit that opens this August, and I’ll paint her on 16″x20″ Ampersand Hardbord. The title for this series of Rots is “Monstrosities.” The problem with Emma was that once I erased the bat wings, she wasn’t quite monsterly enough for the series, so I decided I needed to do a little reworking on the sketch before I started painting.

Here’s the new sketch for Emma, with no bat wings and new ears. Next I’ll size her (16″x20″), print her out in sections that fit on letter-sized paper, tape those together, and transfer the sketch to a sealed and gessoed Ampersand Hardbord. Three hours in, and I haven’t even started painting her yet!

So here’s probably the most tedious part of the process for me, and will likely be the most boring for you: the transfer.
The first thing I do with my sketches to get them ready to transfer to the board I’ll be painting them on is to enlarge them to the correct size in Photoshop. I draw a grid over the image so I know where to crop each section so it will fit on an 8½”x11″ piece of paper for printing. The grid lines also help me line up the pages when I tape them back together after I’ve printed them out.
I’ve started using Ampersand Hardbords to paint on rather than plywood. (See my post about switching.) It was easier than having to cut the plywood down to size, which doesn’t work well when you only have a handheld circular saw to work with. But Hardbord is still wood and it needs to be sealed and gessoed just like plywood. Ampersand suggests three coats of sealer on each side, but I put on four because that’s what my mother would have done. You need to seal both sides so it doesn’t warp. So eight coats of sealer total.
I told you it would be boring.
After the sealer and three coats of gesso (just to the front side), I’m ready to transfer. With a soft drawing pencil (4B or 6B) I shade in the back of the now pieced-together sketch everywhere the sketch is. Kind of works like carbon paper used to back in the day. I’ve tried a couple of different brands of graphite transfer, but I’ve never been satisfied with it because, despite the fact that it’s supposed to be graphite, you can’t really erase it.
Once the back is shaded in, I tape the pieced sketch to the board and draw over the sketch lines to transfer it.
And finally, it’s time to paint!